The IROIN® Influencer Marketing Suite can be integrated with Outlook through an OAuth2 application in Microsoft Azure Active Directory. This ensures that all outgoing emails are sent securely and directly via your business email address – without the need to store passwords.
With this step-by-step guide, you'll be able to complete the integration and start sending emails from within IROIN®. All you need is access to the Azure Active Directory portal and admin permissions.
Step 1: Register the App in Azure Active Directory
-
Go to Azure Active Directory and log in with your admin credentials.
Navigate to App registrations and click New registration.
.png?width=688&height=465&name=Frame%2024%20(1).png)
2.) Enter the following information:
-
Name: Choose a clear and recognizable name (this will appear in the user authorization prompt).
-
Supported account types: Select Accounts in this organizational directory only.
-
Redirect URI: Use your IROIN® instance’s base URL followed by
/silent-oauth.html.
.png?width=688&height=555&name=Frame%2025%20(1).png)
3.) After registration, you'll receive an Application (client) ID. Save this ID – you’ll need it later in the IROIN® configuration.
.png?width=688&height=206&name=Frame%2026%20(1).png)
Step 2: Define API Permissions
-
Click on API permissions in the app menu.
-
Add the required permissions: Click Add a permission.
.png?width=688&height=446&name=Frame%2027%20(1).png)
-
Choose Microsoft Graph.

- Select Delegated permissions.

- Add the following permissions:
-
IMAP.AccessAsUser.All– for reading emails
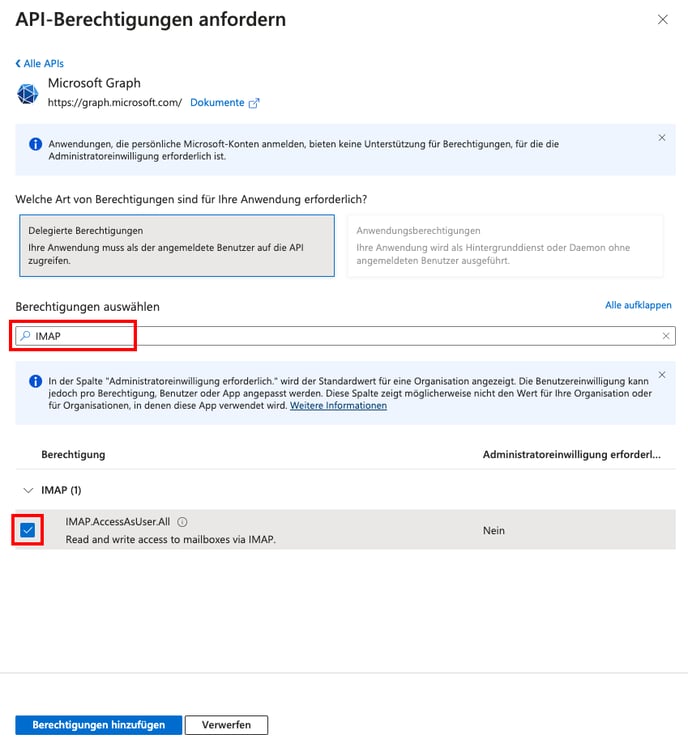
SMTP.Send– for sending emails
offline_access– to refresh access tokens
email– to identify the user’s email address
9.) Confirm your permissions. You should now see all required items listed.
Step 3: Token Configuration
-
Click on Token Configuration.

- Add optional claim.
- Choose ID as the token type and enable the email claim.

- Confirm, and you’ll see the claim listed.
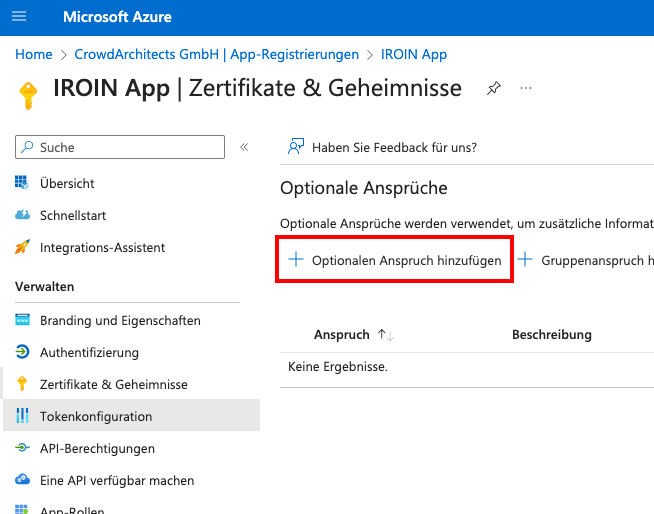
Step 4: Set Up Client Secret
-
Go to Certificates & secrets and click New client secret.
- Enter a description and choose an expiration period. Make sure to renew the secret before it expires to avoid losing access.

2.) Save the client secret:
Once the credentials have been generated, the client secret will be displayed. Copy the value from the "Value" field immediately, as it will no longer be visible after you leave the page.
This is the client secret required for IROIN®.

Step 5: Configure Outlook in the IROIN® Suite
-
Log in to your IROIN® instance and go to Settings → Messaging → Apps.

2.) Click Add App and select Outlook.
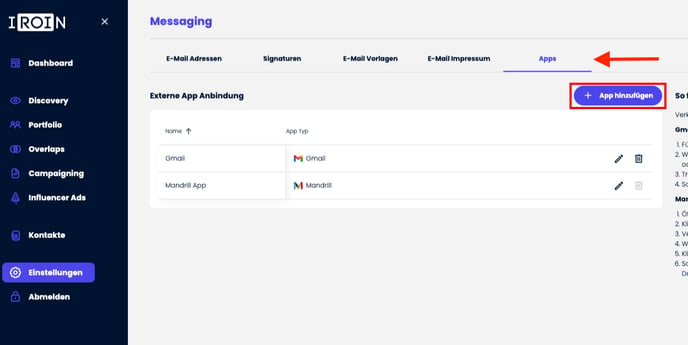
3.) Enter the required Outlook credentials:
-
Azure Application Client ID
-
Client secret
- App Name
- Account type

4.) Save the configuration – and you’re done!
By following these steps, your Outlook mail server will be fully integrated with IROIN®, allowing you to manage and send all communication smoothly and securely through your trusted domain. Need help? Our support team is happy to assist you.