The IROIN® Influencer Marketing Suite can be integrated with Gmail via an OAuth2 application in the Google Cloud Console to optimize your messaging workflows. This step-by-step guide walks you through the integration process so you can send emails directly via IROIN®. You’ll need access to the Google Cloud Console and the necessary permissions.
Create a Project and OAuth Consent Screen in Google Cloud Console
1.) Open the Google Cloud Console and create a new project by clicking on “Create Project.” The wording might differ slightly depending on your current setup, but there should be a dropdown to start. Name your project something like "IROIN Gmail Integration" and save it.

 2.) Go to “APIs & Services”, then click on “Enable APIs and Services.”.

3.) Select the newly created project, then go to “Gmail API” under the Google Workspace section.

4.) Click “Enable”, then in the left-hand navigation, select “OAuth consent screen.”
5.) Now decide which type of users will be allowed access. Choose “Internal” if only users from your organization should have access.
Note: Selecting “External” allows external accounts but would require a full security audit and high costs if you plan to publish the app.
6.) Fill in the required fields, such as the App name, and enter email addresses for support and developers. We recommend using your project name as the app name. Save the settings.

7.) Next, define the required scopes. This can be tricky since the needed scope isn’t always listed or searchable. You’ll need to add it manually:https://mail.google.com/  8.) Once added, select the scope. This scope grants access to IMAP, SMTP, and the user's public profile – nothing more.
9.) Confirm that the Gmail scope table includes the scope you added, then save and continue.
Now that your application is configured, you’ll need to create the credentials for IROIN®.
Create Credentials and Obtain Client ID & Client Secret
1.) From the left menu under APIs & Services, select “Credentials.” If the list is empty, click “Create Credentials” and choose “OAuth Client ID” from the dropdown.
2.) Select “Web application” as the application type.
3.) You’ll need to enter a few URIs:
-
The Application URI (without a path). For example, if your instance is hosted at
https://iroin.ims.iroin.io, this would be the value. -
The OAuth Redirect URI: After a user consents, Google redirects them to this URL with the necessary tokens. This must point to the OAuth handler page in IROIN®:
Example:https://iroin.ims.iroin.io/silent-oauth.html

4.) Click “Create”, and on the Credentials page, find the new entry under OAuth 2.0 Client IDs.
Click “Download” to save the credentials.
Configure in IROIN® and Test the Connection
1.) Switch to your IROIN® instance, and go to:
Settings → Messaging → Apps
2.) You're now in the IROIN® app configuration. Click “Add App” to begin connecting the Gmail integration.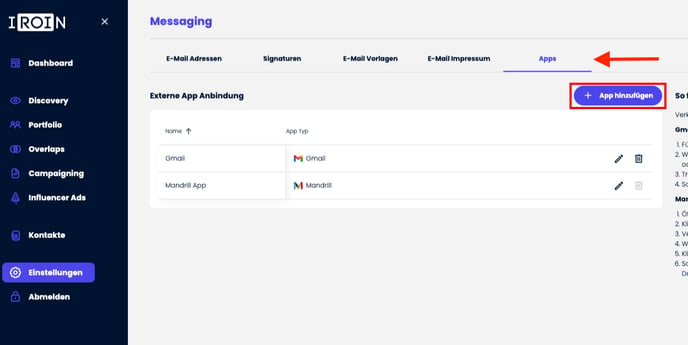
3.) Enter your Gmail credentials (Client ID & Client Secret) on the configuration page and click Save.
That’s it – your Gmail integration is now complete!
You’re ready to send messages via Gmail directly through the IROIN® Suite.